Document - Customer Search
Search window -> Customer # field in documents -> Customer Search
The customer lookup window provides the option to search for and select from the existing customer records already stored in your company's Customer Information file from the operational programs including document entry. This is a useful and necessary tool for the operator when he does not know the correct customer number.
If the Customer# or the Alternate Account number for the customer is known, either can be entered in the customer number field to select or assign the customer record without utilizing the search.
If the first few characters of the alpha key were entered in the Customer# field, then the search program skips the search criteria options and immediately displays any matches as explained in the Search Results below.
Note: The Accounting Customer Search search option is a separate search utility that is available in the Accounts Receivable and reporting programs when a customer number needs to be entered.
Document Customer Search filters:
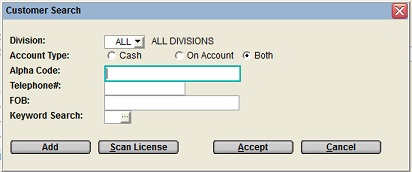
The lookup option first prompts for:
DIVISION
This field defaults to the value specified for "Customer Search" for the operator currently signed into Texada SRM as defined in Operators.
This default division value can always be over-typed as required in the search window.
The division selection choices include:
•Accept the operator default search value for customers as defined in Operators.
•Type ALL to include customers from all divisions in the customer selection list.
•Enter a single division to limit the lookup to include only customers assigned to this specific division, or select the preferred division from the drop-down list.
•Type SEL to select a range of divisions to include in the report, as outlined in Division Select By Region.
ACCOUNT TYPE
Select one of the following account types if relevant to help narrow the search:
•Cash to list only customers flagged as Cash only in the search results.
•On Account to list only customers flagged as charge On Account.
•Both to include all customers.
Search Options:
Select either the Alpha Code search by customer name, or the search by Telephone#, or the Alternate Search by keyword, to build the customer selection list as follows:
•ALPHA CODE:
Enter the first few characters of the Alpha Key for the starting customer in the range to generate a search list.
The Alpha Key field is a field in the AR Customer Information file that is used to alphabetically sort customer records.
For example, if the customer's name was Arrow Construction Company, the alpha key would be entered as ARROW.
If the customer's name was Joe Hardwicke, the alpha key would be entered as HARDWICKE.
Note: To search for a customer using a few characters within the name, preface the characters with the wildcard character % and include at least 2 standard characters to narrow the response.
e.g. %TO would find JOHN HAMILTON, SANDSTONE CRANE, PLUTO SALES, STOFMAN LUMBER
If a list of all customers is required, use the Keyword Search option with no filters.
This could take a few minutes to return the output because of the quantity if records to be sorted.
•TELEPHONE#:
To use the telephone number search, skip the Alpha Code field and enter the first few numbers of the starting Telephone number.
This phone number search checks all the customers' alternate phone numbers as well as main telephone number in Customer Information.
•FOB
The FOB identifiers are optional codes that can be assigned to individual staff for a customer in the Name Check List.
This code can be used to search for a customer by the staff FOB ID, immediately returning the associated customer number.
A customer can also be selected on a rental document by scanning or manually entering this code in the Customer # field on the document header.
If the customer is assigned to the document using the FOB code, the associated name from the Name Check List becomes the staff Name on the document.
•KEYWORD SEARCH:
This advanced keyword search mechanism provides the ability to search on Name, Alpha Key, Trading As, Phone#, Fax#, Address, City, Province/State, and Postal/Zip Code, as defined in the Customer Information.
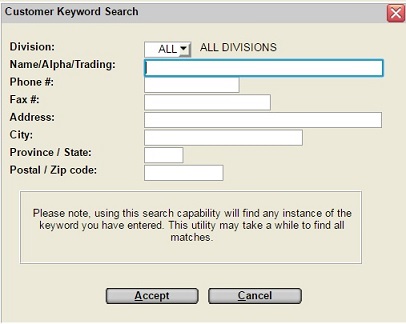
An added advantage of the keyword search method is that it does not just try to match against the starting characters in the field. It searches the entire field. This can be useful if the street name is known but not the complete address for a customer.
Example: If 'WILLOW' is entered in the address field and the customer's address is 121 WILLOW AVENUE, it will find this customer.
Another scenario would be if you knew the exchange number but not the area code for a customer, or if the area code had been entered incorrectly into the system.
By searching for a customer by phone # using the traditional "Telephone#" method, with 208 as the key, the search list will only include those customers whose phone #s start with 208.
By using the Alternate Search method, any customers with the string of numbers '208' anywhere in the phone number will be listed.
Note: For efficiency reasons, the phone number search within the Alternate search, only queries on the main customer phone number. It does not read all the customer's alternate phone numbers.
To minimize the list of customers displayed, multiple search criteria can be specified.
Example: Entering 'WILLOW' in the address field and ON in the Province/State field will only return customers with the string 'WILLOW' in the address and ON in the Province/State.
The Division field can be used to limit the search to only those customers assigned to a specific division or region, as explained above.
Search Results:
The matching customer records are listed with the numbers, names, phone numbers, On Account status, Credit Rating, Contact, Address, Fax number, Account Balance, Alpha Key, Customer Comment, Terms, and Salesman code.
The customer list can be resorted by any column in ascending or descending order, by clicking on the column heading.
Columns can also be dragged and dropped to reposition them as required.
•Click the CHECK LIST button at the bottom of the screen to view the Name Check List for the customer record in focus, with comments as setup in Customer Information.
•Click the ALT PHONE button at the bottom of the screen to view additional phone numbers with extensions and descriptions, for the customer record currently in focus.
To select a customer, double click on the customer record, or click the SEARCH button.
ACTIONS:
Additional actions provided on the Customer Search screen include the ability to Add a new customer from within the search window when entering a document, or to Scan a driver's license to identify or add a new customer as follows:
•Add a New Customer Record:
If the customer was not found in the customer search, a new customer record can be added, by clicking the ADD button.
All On Account customers should have their own customer number.
A flag in the Company Miscellaneous Parameters, controls whether counter staff has permission to add new customers on-the-fly during contract and invoice entry.
If this is activated window on the Customer# field and click the ADD button to add a new customer to the Customer Information file when invoicing.
Note: This is an manual-add action and should not be confused with the auto-add customer cash customer from Counter Documents which is controlled by flags in the Divisional Contract Parameters.
In the abbreviated customer data window, accept the customer number and enter the 'Trading As' name, the name, alpha sort key, address, city, province/state, postal/zip, phone, fax number, license, unique email, website, birth date, and primary customer type.
The Contact Information window is also triggered to capture contacts with email addresses.
When a new customer is added they are automatically given website access with a default password that matches their new customer number and a default email address that matches their new customer number@GW.COM
This web access information can always be modified in this Internet Information window or in the Portal Customer screen.
The option is provided to flag the new Contact that is created to email all documents types or to leave emailing boxes blank.
Other customer values and flags will default to match those setup for the division's "Clone" customer as assigned in the "Customer Settings" of Divisional Contract Parameters.
For information about adding a new customer record in full detail, refer to Customer Information.
If the feature to Change Special Pricing On-The-Fly is activated in the Company Miscellaneous Parameters and the operator has Security Role Permissions to the " Special Pricing On The Fly' option in the Document Field Access window, then immediately after the new customer has been added on-the-fly a Special Pricing window is triggered displaying the default values that can be updated as required for the new customer.
This feature to add new customers on-the-fly can be further controlled by setting up Security Roles and a password for the ARCF06B module in Module Passwords.
Any operator without permission to Add Customer on-the-fly as determined by his roles assigned in Operators, would then have to enter the correct password to proceed entering a new customer record.
For more information on this security feature refer to System Security Overview.
•Scan the Customer's License:
Customers can also be identified or added by capturing driver's license information manually or by using a scan device.
Driver's License/ID information
Both Data and Image Driver's License scanners are compatible with SRM software.
oData Scanners:
Refer to Driver's License Data Scanners for information on the Mag-Stripe swipe, and the 1-dimensional and 2-dimensional barcode scanning options.
Only a 2-Dimensional Scanner is compatible with Web App or Open Client sessions
Note: If the license has both the 1-dimensional and 2-dimensional stripes, it is the 1-dimensional stripe that is automatically read first, so to read the 2-dimensional stripe, cover a portion of the 1-dimensional barcode stripe with your finger to force the scanner to read the 2-dimensional barcode.
oImage Scanners:
Refer to Driver's License ID Image Scanners for details on how to scan the image on the front of the card, retrieving the picture and address information.
The Use IDScan Image Capture option can be activated by division from the Divisional Contract Parameters.
Note: Only the 2-Dimensional Scan option is compatible with Web App or Open Client sessions.
In the window on the Customer# field and click the SCAN LICENSE button, to open the Driver's License window.
The prompts are:
PERFORM SCAN
Depending on the configuration for Driver's License scans setup in the "Customer Settings" of the Divisional Contract Parameters, the Perform Scan field prompts for different information.
oIDScan Image:
This following choice is only offered if the Use IDScan Image Capture option is set to PROMPT in the Divisional Contract Parameters.
Select one of the following action options:
▪Check ID Scan Image Capture to utilize the scanning devise to capture the customer's license information, as outlined in Driver's License ID Image Scanners
▪Check Manual Entry to manually type in the province or state and the driver's license number.
If an existing match to the license number is found, the customer number and address display.
The accuracy % value of the scanned image and data is displayed at the bottom on the ID scan image. Before accepting the ID scan, verify each data field displayed on the screen against the customer's Driver's License for accuracy, and correct any misreads or re-scan the card.
If no match is found, the customer information can be entered manually.
Note: The ID Scan is not compatible with Web App or Open Client sessions.
oMag-Stripe/Barcode Scan:
Either the Mag-Stripe swipe, or the Barcode scan can be used if the Prompt For Driver's Licenses/ID is checked in the Divisional Contract Parameters, and the Use IDScan Image Capture option is set to NO.
Either swipe the card or scan the appropriate 1-dimensional or 2-dimensional barcode on the back of the license, as outlined in Driver's License Data Scanners or manually enter the license details starting with the Province/State field.
The fields that are populated by the scan action or can be entered manually, include:
CUSTOMER NUMBER
If Divisional Contract Parameters is set to Add Cash Customers, a new customer number is immediately assigned and displays on the screen. This customer will automatically be added to the Customer Information.
If your firm does not automatically add cash customers, the customer number remains blank.
NAME
Enter the customer's name from the driver's license.
This name becomes the "Trading As" name for this customer.
ALPHA
Enter the Alpha key, to be used for the sorting of the Customer's Name in alphabetical order.
Window to select an existing customer if this customer is already in your customer file but a match on the driver's license was not found.
The customer information will display.
ADDRESS
If the information is not already displayed, enter the first line of address.
This is a mandatory address field if your firm has activated the Texada Mobile service in the Logistics configuration.
ADDRESS
Enter the second line of address. This field is optional.
CITY
Enter the city.
PROV./STATE
Enter the province.
POSTAL/ZIP.
Enter the postal code or zip code.
A flag in the Required Document Information in the Company Contract Parameters can be set to force the operator to enter a valid Postal or Zip code to match the mask format as setup for the customer's currency the Currency Codes.
BIRTHDATE
Enter the birth date. This field is optional.
TELEPHONE #
Enter the telephone number.
ALTERNATE LANGUAGE
Check this field to print documents for this customer is the alternate language.
Uncheck this field to print documents in the standard language.
Finished?
Click ACCEPT to accept and exit, or click CANCEL to abort.
This license number and name is saved in Customer Information in the Driver's License window.
Enhanced Search for an Existing Cash Customer:
This Enhanced Customer Search option is only available in documents that are most often utilized by repeat business, including Contracts, Counter Worksheet, Sales Orders, Rental and Sales Quotes, Miscellaneous Invoices, Point Of Sale Invoices, Estimates and Work Orders.
The enhanced Customer search feature can be activated by division in the Divisional Miscellaneous Parameters.
This search method attempts to find a match for a customer name or partial name, by matching all words in the name entered, or matching any single word in the name entered.
It applies at document entry when a blank "Customer Number" is entered in Add mode, where it causes a window to open prompting the operator for a customer name for the search.
Note: If the Scan Driver's License processing has also been activate in the Divisional Contract Parameters, the enhanced customer search is provided after the scan, if no customer was selected or added.
For detailed information on the scan feature refer to Driver's License Scanners.
Topic Keyword: ARCF06