Company Customer Forms Configuration
System Maintenance Menu -> Configure System Settings -> System -> Company & Divisions -> Company Parameters -> Customer Forms Configuration
This utility activates and defines the print feature for Forms Control and can be accessed from the Customer Forms window on the Company Parameters.
Crystal and Jasper Reports provide laser style print format options with flexibility customizing reports and documents, using company logos, duplex printing, etc.
Crystal Reports is a third-party reporting software that can be used to design documents that can be viewed or printed as a document, or exported to an Adobe Acrobat for storage or emailing. Crystal documents are generated from the Client.
Jasper Reports is a 'Open Source' product used to design documents that outputs the form to the screen for printing. Jasper documents are generated from the Server.
Note: If Crystal or Jasper reports is activated for Forms Control, then Nebs forms cannot be used for printing Statements.
If invoices or Check Lists for a division are printed using Jasper forms the divisional printer setup in Daily Close Printers or Check List Printers is not respected, because Jasper forms print output to the Client screen.
To use double sided printing, refer to Customer Forms And Duplex Printing for more details on the duplex print feature.
Company Logo on Form:
A custom logo can be printed on the top left corner of each document.
The maximum suggested "created" size for the logo is: 2 CM in height and 11.5 CM in width.
Resized images are not recommended, as they often lose resolution.
•For Crystal Forms:
To utilize a custom logo for all printed Crystal report documents, rename your custom logo file to Logo.bmp and save it in the \scsbin\reports directory on each Client.
•For Jasper Forms:
Jasper will support most standard image format, such as GIF, JPG, PNG, etc.
Setup the file name including full path on the Server in the Company Logo Image Path field in the "Jasper Appearance and Formatting" window.
Terms and Conditions:
To print custom Terms on the back of selected documents, duplex printing must be employed.
The specific company Terms print option can then be employed in the Standard and the Alternate Languages as follows:
•Crystal Terms:
Terms only print on the back of Contracts setup to print duplex in the Customer Forms Document Mapping window.
Rename your custom Terms document file to Terms.doc and save it in the \scsbin\reports directory on each Client.
The maximum size for the Terms document is: 9.6" in height and 7.15" in width, and 1 page only in length.
•Jasper Terms:
Terms print on the back of all Jasper forms that are setup to print duplex in the Customer Forms Document Mapping window, where the duplex format can be triggered by adding a _D to the end of the relevant document names.
The content of the Terms can be setup in a layout of one or two columns as defined in the Jasper Appearance and Formatting window, with the content stored by language under resource property on the server as part of the content of the Language Label file.
The standard text size for the Terms printed on the back of a Jasper document is size 6 font, however if your "Terms and Conditions" do not fit properly on the standard duplex form, select the print program that uses size 5 font for the Terms.
The duplex Jasper forms that offer the reduced print font size include:
oStatements_5_D
oCounterDocument_5_D
oCounterInvoice_5_D
oCounterMisc_5_D
Alternate Language Documents:
Selected customers can be flagged in Customer Information to receive documents in an alternate language is place of the standard English text.
To print custom Terms on the back of each Contract document, duplex printing must be employed.
•Crystal Terms:
Documents printed using Crystal forms respect the alternate language translations as defined in Document Label Fields.
•Jasper Terms:
Jasper documents do not use Document Label Fields. Instead a "reportsLabels" file is used to setup the text and labels for the two preferred languages, as explained below in the Jasper Appearance and Formatting window.
Signature Capture:
Capturing the customer's signature on the Counter documents using Crystal Reports, can be activated by type/division of document.
This signature is not re-displayed on reprints but can be viewed on the PDF copy of the document that is saved in the directory defined in the Signature Capture Settings.
•To utilize signature capturing on Forms Control documents, the serial port pad or USB/HSB pad Topaz T-s751-B is required with the appropriate Windows drivers and executable programs installed.
Please contact Topaz Systems, Inc at http://www.topazsystems.com for pad purchase information.
•Signature requirement can be set to None, Mandatory, or Optional by document type, by division.
•The signature can be captured to a PDF file in a directory accessible from the Client, or to an FTP server, as outlined in the Signature Capture Settings.
Note: Signature Capture is not available with Jasper Forms 3.0 or on Web App or Open Client sessions that must use Jasper Forms.
Paper Size:
Letter size or A4 print options can be employed as follows:
•When generating PDF documents, the PDFCreator automatically sets the default to A4.
In order to prevent truncating documents at the right margin for North American regions, change the Paper Size in the 'PDFCreator Advanced Options' window to Letter, as outlined step by step in Printer Selection.
•To utilize A4 size paper on a workstation, in the 'Windows Printer Setting' window for the Windows Default printer, click on the Printing Preferences and set the "Paper Size" in the 'Advanced Options' window.
Following are the steps:
oClick on Start -> Devices and Printers (or on some Windows versions it would be Printers and Faxes)
oRight click on the desired printer icon, and click on 'Printing Preferences' in the resulting sub-menu
oOn the "Layout" tab, click on the ADVANCED button to access the 'Advanced Options' window for that printer
oIn the 'Advanced Options' window change the Paper Size field to A4
oClick OK to close the option window, and click APPLY to apply the change
•A window in Printer Codes for use with printer type WIN-CRT, can be set to cause documents, inquiries, and reports, to respect A4 or Letter paper size requirements.
•To use A4 paper with Crystal reports the print programs are controlled by the Custom Report defined in the Document/Forms Mappings window and can be activated for all divisions or selectively by operator division as defined in Operators.
•Jasper reports uses the same program in the Document/Forms Mappings window for both A4 and letter size paper.
Direct Document Email:
Email a document directly at the time of the print request as follows:
•Select the Email Customer Docs as PDF from the Printer Selection window prior to initiating the print option.
•The Email A File window opens to capture the subject and To address details.
•For server and address setup information, refer to Email A File.
Note: With Jasper forms, the email addresses defined in the Customer Information / Vendor Information are included in the XML data for each document, to enable a printer with the capability to scan the document and automatically emailed it to the associated addresses.
Contact Jasper Document Emailing feature:
Jasper documents can be emailed to designated Customer/Site or Vendor Contact addresses as defined in Contact Information according to the document Email Types allowed for that Contact.
This Use Contact Document Emailing feature can be activated in the Company Email Configuration and a Default Email Signature can be setup.
This email option is then provided at document creation, or from a bulk print run request such as Statements, Cycle Billing or Daily Close invoice printing.
In a bulk email run a separate email is generated for each document even if several documents are being sent to the same recipient, and a report is generated to track the recipients for each document.
When emailing a single document at creation, the operator has the opportunity to edit the recipients and the body of the email in the Compose Email, or to escape out of the Email screen to print the Jasper document to the screen.
All emails including automated emails are noted in the email log file that can be reviewed in View Email Log in a display only format.
Report Statistics:
Each time a report is printed either to PDF or to Jasper reports, a record can be captured indicating the type of report, which can then be used to aggregate and report on print jobs.
When the environment variable TSI_REPORT_COUNT is set, a line is added to PRODATA/report_count.txt indicating the type of report.
The report_count.py can be used to report on statistics.
The environment variable TSI_REPORT_COUNT can be to 'Y; to always log a count, or it can be set to a YYYYMMDD string or substring as follows:
Y - always log
2016 - log in 2016 only
201609 - log in 2016/09
20160905 - log in 2016/09/0
Faxing:
Crystal Reports does not support direct document faxing:
•If the direct faxing utilities are used, the standard print format of the document will be faxed.
•If a Forms Control document is required, print the document and fax a copy manually.
Contact Texada Support for more information on purchasing and activating the Crystal Report software.
Note: If a company uses Crystal Reports, run this utility after any update is imported in order to ensure that the file definitions are updated correctly.
Running Load Global Update also generates this Crystal Report Layout update.
Before initiating these controls, it is important to confirm that no one else is printing any counter documents.
General Settings
FORM GENERATION METHOD
The ability to activated Crystal or Jasper Forms is restricted to Texada Support.
Select one of the following document printing options:
•Select Plain Paper to always use standard forms on plain or pre-printed paper.
•Select Crystal to utilize the third-party Crystal Forms program to customize your printable documents.
•Select Jasper to utilize the open source forms program to customize your printable documents.
Note: Jasper PDF can be used for label printing, even though the Jasper document printing option is not selected, however Jasper reports must be installed and activated in the Barcode Settings of the Company Inventory Parameters.
JASPER APPEARANCE AND FORMATTING
This window only applies to Jasper Forms and/or Texada Web.
This window is disabled for Plain Paper and Crystal printing if Texada Web is not activated in the Logistics setup.
Note: Jasper documents printed from a Play company environment include a note in the header Comments to identify that the document is not generated from a "Live environment".
The Jasper setup controls include:
COMPANY LOGO IMAGE PATH
Jasper will support most standard image format, such as GIF, JPG, PNG, etc.
Enter the file name (e.g. such as GIF, JPG, PNG file) with the full path on the Server.
Note: For a Windows server, the logo path separators must be \\ (double backslash) instead of \ (single backslash).
e.g. c:\\scsbin\\jasper\\reports\\texadasoftware.bmp
For Linux the separators are / (single forward slashes)
e.g. /usr/local/tsi/jasperreport/reports/texadasoftware.bmp
DIVISION LOGOS IMAGE PATHS
Window to setup unique language for specific stores by division.
If the Image Path for a division is left blank, then the company logo applies.
On Jasper documents, the logo prints according to the document division.
On Jasper statements, the logo prints according to the customer's division set in Customer Information.
TERMS AND CONDITIONS
Select one of the following layout options:
•Select 1 Column to print the terms and conditions on the back of the document over the full width of the page.
•Select 2 Columns to use a two column layout for printing the terms and conditions, which is sometimes considered easier to read when the printing is small.
Refer to Jasper Document Terms and Conditions for information on the how to change the property file for all field labels, and how to modify the terms and conditions for duplex version.
•Alternatively select PDF to print the terms and conditions from the defined PDF according to the customer's language preference.
STANDARD LANGUAGE PDF FILENAME / ALTERNATE LANGUAGE FILENAME
Select the PDF document for each language from the Directory Browser window.
These PDF documents can be maintained in the Directory Browser window by clicking the "Add file" icon to the right.
STANDARD LANGUAGE ENCODING
SRM Software provides the ability to print customer documents in either of two languages as controlled by the Alternate Language flag designation for the customer in Customer Information.
The standard language code file distributed with the SRM software for text and label sets on the document, is the English resource called 'en US' by the ISO government standards.
The static labels for this language are distributed with the software in the $JASPER_INSTALL_DIR/reports directory on the server in "reportLabels_en_US.properties".
ALTERNATE LANGUAGE ENCODING
The alternate language code file distributed with the SRM software for text and labels on the document, is the French resource called fr CA by the ISO government standards.
Depending on the language code and country code, a company could have multiple property files.
The two files distributed under $JASPER_INSTALL_DIR/reports directory on the server are "reportLabels.properties" and "reportLabels_en_US.properties".
To customize a language file, make a copy of "reportLabels.properties" and use any editor to modify the labels on the right.
Do NOT makes changes to any part of the property label on the LEFT side of the equals (=) symbol.
Then save the updated file with the appropriate name in the $JASPER_INSTALL_DIR/reports directory.
e.g. "reportLabels_fr_CA.properties"
Confirm that the value in the Alternate Language Encoding field matches the language of this translation file.
EDIT FORMS
This action is restricted to Texada Support & Services.
Click the EDIT FORMS button to use the Directory Browser utility to edit the forms and labels in the /usr/local/tsi/jasperreport or c:\scsbin\jasper folder, allowing download, upload, and delete of files.
Note: On a SAAS environment (Software As A Service), it will provide the ability to view the default forms, or edit the saas-customer-specific directory, allowing upload, download, and delete of files.
Finished?
Click OK to accept the setup and exit.
JASPER TYPES
Click the JASPER TYPES button to view list of customer forms with the corresponding Jasper Form and Function in an Information Log window that allows the list to be exported or printed.
DEBUG MODE
Click the DEBUG button to view and set a debug option in the resulting Selection Required window.
This debugging is active for the current session only, and is useful for the operator to view the xml data generated when modifying the forms.
Select one of the following:
•Generate XML Only to cause the xml code to be printed instead of the forms document.
•Generate PDF and XML to output both the xml code and the resulting document.
•Turn Debugging Off to skip printing any xml code as debug is not required.
The selected debug option is then displayed as the button label.
Log Forms Errors:
If a Jasper form is triggering "Unable to generate form" errors, a detail log can be created to analyze or to forward to Texada Support for assistance.
To cause the log to be generated, create the file c:\scsbin\tsi_jasper.dev on the server.
Then the next time a Jasper document fails (e.g. can't find logo name) the View A Text File window will open displaying the Jasper error log.
The document will not print but the forms error will still be displayed.
PROMPT FORMAT ON REPRINT
Check this box if Crystal or Jasper Reports has been activated, but old documents should sometimes be re-printed in the old format, and the operator needs to be prompted whether to print in the Forms format or the Old format.
The option to print using the "old format" is only offered on document re-print utilities.
Uncheck this box to print all documents in the selected Forms Control format without prompting. e.g. 30 or 40
DOCUMENT/FORMS MAPPING
The Crystal and Jasper forms and the Texada Web features provide the option to print different customized report formats including Letter or A4 size, depending on the division.
Window to view and maintain the reporting programs for your firm, as outlined in Document/Forms Mappings.
Up to 999 temporary working directories on the server are used to build the data each time a document is requested before the report can be sent down to the Client, to allow simultaneous document printing.
Directories are re-used after 2 days.
PRINT 1st 5 RATES ON COUNTER DOCS
Standard rental documents that are configured to print 5 rates for each rental product, print the first 5 rates flagged in the Company Default Rates to print on the 'Ratebook'.
This parameter only applies to Jasper forms.
For Jasper rental documents including Contracts, Reservations, and Quotes, this parameter can be checked to cause the first 5 rates associated with the specific product on each line item to print, instead of the rate codes flagged globally by the company/division ratebooks.
SUPPRESS RATES ON PO
When a Purchase Order is triggered for a rental product being ordered directly for a Contract, the Contract Rates can be configured to print on the associated P.O. product detail.
Check this box if product rates should not be printed on the P.O. detail line for rental products ordered from a Contract.
Uncheck this box to print the product rates on the P.O. detail line.
The product Notes and the Rental Period always print on the Jasper P.O. details.
Refer to Contract/Purchase Order Link Overview for more details.
SHOW RENT PERIOD 1 DAY IF LESS THAN 1 DAY & DAILY RATE USED
Check this box to print a one day rental period on the document when the Rental Period for the item is actually less than a day, but the item is being billed the full daily rate.
This feature applies to Jasper Invoices/Contracts/Quotes/Reservations and Plain Paper Invoices.
Note: Exceptions could occur due to Pro-rating or Over-time hours as controlled by the Rental Product Class.
Uncheck this box if the documents should always print the partial day period even when billing a full days rental.
PROMPT FOR PAYMENT RECEIPT
Select one of the following print options for the Print Receipt that can be generated whenever a payment is made for an Invoice or Deposit or On Account:
•Select C - Counter to only prompt to print the receipt on Invoice Payments and document Deposits.
No prompt is generated for Customer Payments on account.
•Select N - No if your firm does not give payment receipts and the prompt to print the receipt should never be generated.
•Select Y - Yes to always prompt to print the receipt whenever a payment is made for an Invoice or Deposit or On Account.
RESET FILEDEFS
Click the RESET FILES button to regenerate the Forms print functions with the correct file definitions.
Running Load Global Update also generates this Report Layout update.
Signature Capture Settings
To capture the customer's signature in the GUI environment after a Crystal or Jasper Forms Control document is printed, the serial port pad or USB/HSB pad Topaz T-s751-B is required, with the appropriate Windows installed.
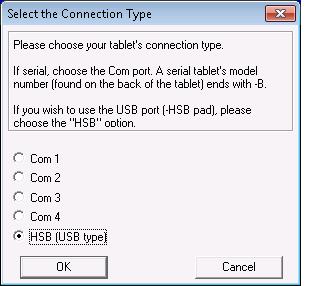
To install Windows drivers on each client workstation after connecting the pad on COM1 port or USB port, run \scsbin\TS751_sigpad_drivers.exe and follow the screen instructions, choosing the correct connection type for each workstation based on serial port or USB/HSB port.
Example:
The customer's signature is captured using PDF.
On each client workstation, \scsbin\pdfinst.bat must be run to install the "PDFCreator" printer driver. PDFCreator version 0.9.3 or higher is required.
Window7 requires version 0.9.9 or higher.
Printing uses the PDFCreator auto-save feature, and will overwrite any existing auto-save settings that may be in place on the client workstation.
Note: Signature Capture is not available with Jasper Forms 3.0 or on Web App or Open Client sessions that use Jasper Forms.
Signature Capture only occurs when the document is actually printed. It does not apply when viewing the document on the screen.
In the expanded document detail record in Custom Crystal Report Mapping, the mandatory/optional signature requirement or document archive, can be set by document type, by division for Crystal forms.
Setup and activate the Signature Capture Settings as follows:
STORAGE MODE
Type OFF if your firm does not wish to capture the customer signatures on any document.
Type FILE to capture the customer's signature copying it to a file in a directory accessible from the Client.
The File is read only, but if saved to a Windows shared directory, then there is the risk that signature documents can be changed or deleted.
Type FTP to capture the signature copying it to an ftp server accessible from the Client.
Capturing to an FTP server is more secure than capturing to a file. A password protected FTP server and also a Web server can be setup on the same computer so that the protected FTP server is used to update the signature and the Web server is only used to view the signature documents.
CAPTURE EXE
The executable file to capture the signature on a Crystal form is:
TS751_sigpad.exe (for serial port)
TS751_HSB_sigpad.exe (for USB/HSB port)
Note: All client workstations have to use same type of signature pad for each company code.
DIRECTORY PATH, NAME, PASSWORD
These setting applies to both Crystal and Jasper forms.
•The Directory Path for File capture is either a local directory or a Windows shared directory that the Client sessions must have write access to as follows:
oCreate directory to store documents:
C:\Docstore\SignedDocs
oShare C:\Docstore as readable and writeable.
Share name is "Docstore".
oShare C:\Docstore\SignedDocs as read-only.
Share name is "SignedDocs".
Distribute this name\link as the location where staff go to view documents.
Example directory path setup for FILE:
Storage Mode..: FILE SAVE TO DIRECTORY
Capture Exe...: TS751_sigpad.exe
Directory Path: \\<computer name>\Docstore\SignedDocs
User Name.....:
Password......:
Note: Signatures and document will not be saved in Play and Training company environments, unless the Directory Path ends in "play", "trng", or "training".
e.g. <computer name>\\Docstore\SignedDocs\Play
•The Directory Path for FTP capture is the server name or IP address with the directory where the files are to be placed.
Example setup for FTP:
Storage Mode..: FTP SAVE TO FTP SERVER
Capture Exe...: TS751_sigpad.exe
Directory Path: 111.222.33.4/docstore
User Name.....: XXX
Password......: YYY
The files are stored according to the Directory Path, in subdirectories by the Company Name\Doctype\Docno. This way documents can be kept separate if there are separate companies.
Contact Texada Support for assistance with the setup.
Finished?
Click OK to accept the selections.
Topic Keyword: CY_FILE2