Rental Product Classes
System Maintenance Menu -> Configure System Settings -> Accounting Tab -> Inventory -> Rental Classes
Product Classes are equivalent to general titles, organizing your inventory into distinct sections for reporting and lookup capabilities.
1.The product class determines the posting to the General Ledger for Revenues and Inventory. Items that have separate General Ledger inventory accounts or separate Revenue Accounts must have their own Product Classes.
2.Rental equipment and sales inventory must be setup in separate product classes to facilitate the distinct G/L posting requirements.
See NOTE ON GENERAL LEDGER POSTING for more information.
3.The product class can be assigned a tax exempt status when all products in the class are non-taxable for the specified tax code.
4.An optional Service Charge can be associated with a product class so that when a product in the class is invoiced, either a flat rate or a percent of the rental can be automatically charged for the related service.
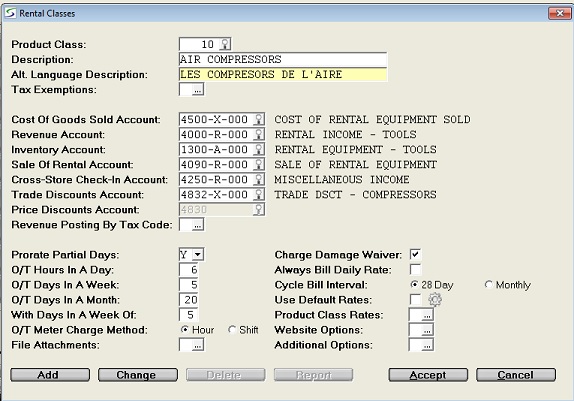
Rentals classes can be maintained in the Rental Product Class window in the "Inventory" parameters on the Accounting tab of the Configure System Settings.
An operator must be assigned a Security Role that allows permission to the Accounting - Rental Classes in order to access this table.
This role permission also controls the operator's ability to add new classes when adding new rental products on-the-fly.
A.R.A. PRODUCT CLASSES:
The American Rental Association suggested classes include:
Unassigned 50 Bars & Staging
10 Air Compressors 51 BBQ & Accessories
11 Air Tools & Accessories 52 Casino Equip & Games
12 Automotive Tools 53 Chafing Dishes
13 Compaction Equipment 54 Cutlery
14 Concrete & Masonry 55 Dinnerware
15 Drywall Tools 56 Glasses
16 Exercise Equipment 57 Silver Serving Items
18 Floor & Carpet Tools 58 Stainless Serving Items
19 Generators 59 Tables and Chairs
20 Heaters & Fans 60 Table Accessories
21 Hydraulic Jacks & Lifts 61 Tents and Marquees
22 Lawn & Garden & Household 62 Trays
23 Medical Equipment 63 Wedding Arches & Access
24 Moving Equipment 64 Miscellaneous Party
25 Painting & Decorating 80 Miscellaneous Party Merchandise
26 Plumbing Tools 81 Paper Goods
27 Pumps & Hoses 82 Balloons & Decorations
28 Saws 90 Miscellaneous Tool Merchandise
29 Scaffolding 91 Fasteners
30 Skid Steer Loaders & Trenchers 92 Finishing
31 Welding Equipment 93 Abrasives
32 Miscellaneous Tools 94 Parts
NOTES ON GENERAL LEDGER POSTING:
General Ledger posting of rentals and sale of rental equipment is controlled by the G/L Account numbers assigned to the Product Class. The posting uses these accounts numbers automatically when invoices are posted during the Daily Close process. Rental equipment and sales inventory must be in separate product classes to permit the rental and sales income to post to separate General Ledger accounts.
EXAMPLE: RENTAL ITEM: Chain Saw
SELLING PRICE: $ 500.00
COST: $ 300.00
ACCUM. DEP'N: $ 120.00
RENTED FOR $ 100.00
When rental equipment is purchased:
Rental Inventory is DEBITED Acct# 1300 for $ 300.00
Accounts Payable is CREDITED Acct# 2000 for $ 300.00
When rental equipment is rented:
Rental Revenue is CREDITED Acct# 4000 for $ 100.00
Accounts Receivable is DEBITED Acct# 1200 for $ 100.00
When rental equipment is sold: - using Average Cost
Sales of Rental Equip is CREDITED Acct# 4090 for $ 500.00
Accounts Receivable is DEBITED Acct# 1200 for $ 500.00
Rental Inventory is CREDITED Acct# 1300 for $ 300.00
Cost of Rental Equip Sold DEBITED Acct# 4500 for $ 300.00
The item is recorded on the Disposal Transactions with the current amount of Depreciation at the time of invoicing. When Average Cost is used, the depreciation is not automatically posted to the General Ledger.
See Allocate Bulk Disposals for details on the Disposals of Fixed Assets.
When rental equipment is sold: - using Average Cost with Selling Price Table
The postings generated are the same as detailed above for sale of rental equipment using the average cost, except instead of using the list price the selling price is based on the age of the equipment.
The Selling Price Table is setup using a cost factor by age in months of the rental equipment. The formula used is: Selling Price = Average Cost * Cost Factor
The Selling Price formula for used equipment by Product Class, only applies to Non-Bulk Rental Equipment with an Average Cost and with a Date Acquired on the Fixed Asset Tag.
When rental equipment is sold: - using Book Value
Sales of Rental Equip is CREDITED Acct# 4090 for $ 500.00
Accounts Receivable is DEBITED Acct# 1200 for $ 500.00
Rental Inventory is CREDITED Acct# 1300 for $ 180.00 *
Cost of Rental Equip Sold DEBITED Acct# 4500 for $ 180.00
* Book Value = Original Cost - Accumulated Depreciation = 300 - 120 = 180
Note: Book Value or Average Cost is set in the Company Posting Parameters with SALE OF RENTAL USE BOOK VALUE.
See the Disposal of Fixed Assets discussed in Allocate Bulk Disposals.
The prompts to create a new Rental Product Class are:
PRODUCT CLASS
Accept the default product class number displayed or over-type it with the number for this class. Use up to five characters.
Note: Product Class numbers, Group numbers, Website Category numbers and Subcategory numbers cannot contain the "|" (pipe) character as this is not interpreted correctly in a browser, and an error will be triggered preventing its use.
Also to avoid URL errors the 5 special characters "/&?%+"are not allowed in the numbering sequence when creating new Product Classes.
The Product Class number sequence is controlled by Last Used Transactions, for module RSPC. The value in the TRX # column is the last assigned Class #. The value in the Running Balance column is the increment by which the auto-assign number is increased.
In Change Mode a window is provided to select an existing Product Class as outlined in Product Class Search.
Note: Once a Product Class has been assigned to Rental Inventory it can be changed using the Update Class/Group/Vendor on Product utility.
DESCRIPTION
Describe this product class. Use up to 30 characters.
ALT. LANGUAGE DESCRIPTION
If your firm utilizes the Alternate Language feature as activated in the Company Miscellaneous Parameters, enter the alternate description for the name of this class.
This name will print on documents and reports for customers that are flagged to reflect the alternate language verbiage.
TAXES
There are several tax processing methods, each of which impacts this product class differently.
Refer to Tax Maintenance Overview to review the regulations determining the tax selection using either taxing method.
•Standard Taxing
For the standard simple tax processing that handles two tax codes, the Tax prompts include:
CHARGE TAX CODE 1
Check this box if equipment in the class should be charged Tax 1 as defined for the customer or division.
Uncheck this box if equipment in the class is exempt from Tax 1.
CHARGE TAX CODE 2
Check this box if equipment in the class should be charged Tax 2 as defined for the customer or division.
Uncheck this box if equipment in the class is exempt from Tax 2.
•Enhanced Taxing
The purpose of the Enhanced Tax method is to allow more than two tax codes to be tracked according to Location, and to be charged on products, services, and Damage Waivers, and to allow for tax exemptions on any or all of these charges.
The Enhanced taxing method can be activated in the Company Taxing Parameters.
TAX EXEMPTIONS
This field provides a Tax Exemptions window to enter or update tax exemptions for products in this Product Class as explained in Tax Exemptions By Class.
Class exemptions apply regardless of Site, Customer, or Division taxes.
•Vertex Taxing
Vertex Tax processing is a third party application that can be activated from the Company Taxing Parameters.
Vertex can be used to combine multiple tax combinations based on the store location and the customer Shipping or Billing address to determine the tax calculation on each document.
•Avalara Taxing
Avalara Tax processing is also a third party application that can be activated from the Company Taxing Parameters that calculates the taxes respecting the complicated tax laws based on multiple tax combinations according to your store location and the customer Shipping or Site address.
When the Avalara tax processing is activated the Tax prompts include:
AVATAX CODE
Enter the AvaTax code for this Rental Product Class or select it from the Select AvaTax System Tax Codes window.
This value defaults from Class Defaults when a new Rental Class is created.
AVATAX DISPOSAL CODE
Enter the AvaTax code for disposals of Assets or select it from the Select AvaTax System Tax Codes window.
This value defaults from Class Defaults when a new Rental Class is created.
Note: These AvaTax Codes do not default to new products but if there is no AvaTax or AvaTax Disposal Code at the product level, then the AvaTax or Disposal Code assigned at the Class level applies on the document and if there is no AvaTax or Disposal Code at the Class level then the AvaTax or Disposal Code at the Group level is automatically applied on the document.
COST OF GOODS SOLD ACCOUNT
Enter an Expense account that will be debited with the cost or book value of the item when sold, or select it from the window, searching by account number or account description.
Example: Acct# 4500 Cost of Rental Equip. Sold.
REVENUE ACCOUNT
Enter a Revenue account that will be credited with the rental income when a rental item is rented, or select it from the window, searching by account number or account description.
Example: Acct# 4000 Rental Income.
INVENTORY ACCOUNT
Enter an Asset account that will be debited with the cost of the rental equipment when rental equipment is purchased, or select it from the window, searching by account number or account description. (This account also gets credited with the cost of the rental equipment when it is sold).
Example: Acct# 1300 Rental Equipment inventory account.
The type of GL account assigned to the Class as the "Inventory" posting account, also controls how the Inventory Yes or No flag is set when new equipment is "auto-added" into Rental Inventory.
Refer to Inventory Flag Defaults for information on this default.
Note: When a product is ordered on a Purchase Order the Inventory posting account can be changed for that specific order, if the Allow Override Of GL Account On PO Details setting in the Company Security Parameters.
SALE OF RENTAL ACCOUNT
Enter a Revenue account that will be credited with the selling price when rental equipment is sold, or select it from the window, searching by account number or account description.
This should NOT be the same account as was selected for REVENUE ACCOUNT above, since rental revenue and sale of rental equipment should post to separate accounts.
Example: Acct# 4090 Sale of Rental Equipment.
CROSS STORE CHECK-IN ACCOUNT
When non-bulk rental products are returned to a different division from the owning division on the Fixed Asset Tag, a portion of the revenue can be assigned to the returning division. This percentage can be setup in the Divisional Return Parameters.
Enter the Revenue Account to be credited with the portion of the rental to be allocated to the return division, or select it from the window, searching by account number or account description.
TRADE DISCOUNTS ACCOUNT
Enter the G/L Expense account to which to Debit the Trade Discount portion, for relevant products in this class. This account will receive the posting, rather than reduce the Revenue Account.
If no account is specified, then the Revenue Account will be reduced by the discount amount with the debit posting.
PRICE DISCOUNTS ACCOUNT
This parameter is only active if Post Document Discounts To G/L has been activated in the Company Posting Parameters.
When discounts are posted separately, the gross product charge is posted as a Credit to the product Revenue account and any discounted amounts are posted as Debits to the Discount Expense account.
Enter the G/L Expense account to track discounts given through rate/price over-rides and discount percents given for products on the document.
REVENUE POSTING BY TAX CODE
Skip this field if the revenue should be posted according to the Revenue Account selected above. This is the standard method.
In special situations, a Revenue Posting By Tax Code can be defined in the window, so that if an invoice for a rental product in this class is posted charging a Tax Code listed here, it will post both the 'Rental Revenue' and the 'Sale Of Rental Equipment Revenue' to the corresponding Revenue Account associated with the Tax Code in this window.
If the tax code is not included in this list, the revenue will be posted to the standard Revenue Accounts assigned to this Product Class.
Revenue Posting By Tax Code window:
TAX CODE
Enter a Tax Code, or select a code from the drop-down list.
DESCRIPTION
The Tax description displays as setup in Tax Codes.
REV ACCT
Enter a G/L Revenue Account, or select one from the G/L Account Search window.
Invoices for rental products in this class with this tax code will post the revenue to this G/L Account.
DESCRIPTION
The description of the G/L account displays.
PRORATE PARTIAL DAYS
The process of prorating calculates the rental charge of a partial period so instead of charging the full daily rate for a partial day, it only bills for actual time out.
Prorating does not apply to equipment out for less than one day. It applies to time out past a day, and also partial days past the weekly or past the monthly period.
Select one of the following partial day rate calculation options from the drop-down list:
•Y (YES) if this product class should have the rental rates for partial days prorated, after one day.
For example, if equipment is out for 2 1/4 days your firm would charge 2 days plus a portion for the third day.
This portion for the partial day rate is determined by the prompt O/T Hours In A Day.
•H (HALF-DAY) if equipment in this product class should have the rental rates for partial days always prorated by the half day, after one day.
The hours equal to a half day are determined by the value entered for the next prompt O/T Hours In A Day.
For example, if the equipment is out for 2 days and a fraction of a day. If the fractional hours on the return day are less than the O/T Hours In A Day, your firm would charge 2 days plus half a day. If the fractional hours on the return day are greater than the O/T Hours In A Day, your firm would charge 3 days.
•N (NO) if this product class should NOT have the rental rates for partial days prorated.
For example, if the total hours out for the equipment equals 2 1/4 days your firm would charge 3 full days.
This setting uses the Time Out and the Time In to calculate the exact total hours that the product was out.
Based on a 24 hour calendar day, from Monday at Noon to Tuesday at Noon would equal 24 hours or 1 billing day.
•F (FULL-DAY) if rental products in this product class should NOT have the rental rates for partial days prorated but instead should charge the full daily rate for each partial calendar day.
This processing uses the straight calendar date regardless of the time of the day that the product goes out or is returned.
For example, from Monday at Noon to Tuesday at Noon would equal 2 days billing because the product was out for part of 2 calendar days.
Note: Any Off Rental for equipment in a class flagged to bill Full days, considers the first day off rent not billable (or billed at the off rent rate) and all of the last day fully billable as back-on rent.
i.e. equipment is off rent from Monday to Wednesday so the rental charge is reduced for two days
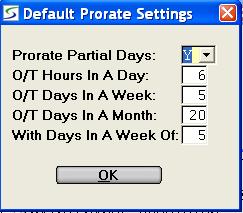
O/T HOURS IN A DAY
The value entered in this field is directly related to the Prorate Partial Days flag set for this Product Class, as follows:
When Prorate Partial Days = Y (YES):
Enter the number of overtime hours equal to a day. This applies after the first day.
The American Rental Association (ARA) suggests that the overtime number of hours per day should be six. By accepting, the customer will be charged 1/6 of the daily rate for each overtime hour. After six hours, the customer is charged the daily rate.
Example: An Air Compressor rents for $60 a day.
For 2 days and 3 hours, the rental charge would be calculated as follows:
(2 Days * $60) + (1/6 * $60 * 3 hours)
=120 + 30
=150
When Prorate Partial Days = H (HALF-DAY):
Enter the number of hours equal to half a day, after one day.
If the extra hours to be prorated are less than this, then half the daily rate is charged. If the extra hours to be prorated exceed this, then another full day's rental is charged.
When Prorate Partial Days = N (NO):
This prompt will be ignored by the rate calculation as partial days are not prorated for this class.
When Prorate Partial Days = F (FULL-DAY):
This prompt will be ignored by the rate calculation as partial days are not prorated for this class.
O/T DAYS IN A WEEK
This assigns the number of overtime days in a week. This applies after the first week.
If this field is blank, it reverts to the daily rate.
The American Rental Association (ARA) suggests that the overtime number of days per week should be five. By accepting 5, the customer will be charged 1/5 of the weekly rate for each overtime day. After five days, the customer is charged for the full week.
Example: An Air Compressor rents for $240 a week.
For 1 week and 2 days, the charge totals:
(1 Week * $240) + (2/5 * $240)
= 240 + 96
= 336
NOTE: If your firm charges the daily rate for each overtime day, divide the weekly rate by the daily rate to determine the number of Overtime Days In a Week to use.
If this number equals a fraction, round up or down.
O/T DAYS IN A MONTH
This assigns the number of overtime days in a month (or 4 Weeks). This applies after the first month (or 4 Weeks).
If this field is blank, it reverts to the daily/weekly rate.
The American Rental Association (ARA) suggests that the overtime number of days per month should be 20. By accepting 20, the customer will be charged 1/20 of the monthly rate for each overtime day. After twenty days, the customer is charged for the full month.
Example: An Air Compressor rents at $720 for 4 Weeks.
If it is out for 6 weeks, the rental charges would be calculated as:
(4 Weeks @ $720) + (2 weeks @ 2/4 * $720)
= 720 + 360
= 1080
WITH DAYS IN A WEEK OF __
This assigns the number of overtime days in a week, when the rental is over one month (or 4 weeks).
This only applies after the first month (or 4 Weeks).
If this field is blank, it reverts to the daily/weekly rate.
The American Rental Association (ARA) suggests that the number of overtime days in a week after the first month should be 5. At 5 days, the weekly rate will be charged. Generally this prompt is set the same as O/T Hours In A Day.
O/T METER CHARGE METHOD
Certain products can be setup to track and bill meter units in Rental Inventory. The rental rates for such equipment can allow a number of meter units to be included at no extra charge, for each specific rate level. Meter units above the included number of units for that rate level are then chargeable.
Select one of:
•Select Hour to bill any units over the included meter units by the meter rate per unit, as setup in each of the rental rate levels for the product.
•Select Shift to bill over time hours by the shift.
This is usually applied only to products that track actual equipment usage by meter units of an hour. These hourly units of use should not be confused with the hours out on rent. The Meter flag in Rental Equipment, must be set to 'M' for equipment to use Shift overtime billing.
The Shift method allows for a set number of hours per rate equal to one shift, to be included at no charge.
If the hours used exceeds the included hours of one shift, but is less than twice the included hours, this is considered to be two shifts and this second shift is billed at amount calculated as a shift rate.
If the hours used is more than twice that allowed for a shift, then the second and third shifts are billed at the calculated shift rate.
If the product rental rate is charging overtime as a fraction of weeks/months, then the meter shift also uses the fraction of the week/month as the shift rate.
oThe included number of meter units is determined from the rental period, using (the number of months in the rental period times the monthly included units) plus (the number of weeks in the rental period times the weekly included units) plus the number of days in the rental period times the days included units).
oThe shift rate charged is determined similarly, from the rental period using (the number of months times the monthly rate) plus (the number of weeks times the weekly rate) plus the number of days times the daily rate).
oAfter the first included shift, this calculated shift rate is then charged per shift.
Example of setup of Product rates with Shift Meter Rates:
RATE TO HRS RATE HRS METER INCL METER RATE
---- ------ -------- ---------- ----------
DAILY 96 24 8 10
WEEKLY 504 168 40 70
MONTHLY 9999 672 160 280
The meter reading always prints on the invoice for rental equipment belonging to a Product Class that uses the Shift meter calculation method, regardless of the flag in the " Print Settings" of the Divisional Invoice Parameters. This flag only controls printing the standard Hourly meter usage on the invoice.
Meter Billing Calculation:
There are two approaches for calculating the meter charges on interim billings over a long term contract as configured in the Company Billing Parameters.
•Standard: Accumulates and totals the "Included" units allowed over the full contract rental period, before ever billing over-time units.
•Enhanced: Respects the "Included" units for the specific interim billing period and bills over-time units for that period regardless of prior accumulated included/used units.
FILE ATTACHMENTS
Multiple external documents or images can be associated with this class when setup in the File Attachments window.
This field is disabled if there is no attachment directory defined in Company Miscellaneous Parameters.
CHARGE DAMAGE WAIVER
Uncheck this box if products in this Product Class should not be charged Damage Waiver.
Check this box if products in this Product Class are eligible for Damage Waiver.
Note: If this box is checked and if the Use Damage Waiver Per Item Value Limits feature is activated in the Company Contract Parameters, when products in this class are rented the Damage Waiver becomes mandatory on the document.
ALWAYS BILL DAILY RATE
Uncheck this box if the rental items in this class have standard rental rates, i.e. day, week and month (or 4 weeks).
Party items which have event rates should also set this field to N (NO).
Check this box if the rental items in this class have been setup with a daily rate only, which is to be billed for every day of the month. To accomplish this, the appropriate rate and rate hours for this Daily rate need to be setup, and the "To Hours" field needs to be set to 9999.
Example, signs, flashers & barricades, or scaffolding often rent on a daily basis only, such as $1.00/day. If there were 30 days in the month, every day would be billed at $1.00 per day resulting in a $30.00 charge to the customer.
Note: This is true even if your calendar has been set to 5 days a week - the software would still bill 7 days a week (every day possible is charged the same amount at the daily rate for the duration of the billing).
This is also true regardless of any no charge weekend setting setup in Divisional Weekend Charge Codes.
This does not apply to Sales items.
CYCLE BILL INTERVAL
Select one of:
•Select 28 Day if the items in this class should be billed on a 4 Week Basis. When equipment is out for one year, 13 invoices would be issued to the customer, 1 invoice every 4 Weeks(28 days).
•Select Monthly if the items in this class should be billed on a Calendar Month basis. When equipment is out for one year, 12 invoices would be issued to the customer, 1 invoice every month (28, 29, 30, or 31 days depending on the calendar month).
USE DEFAULT RATES
Check this box if this Product Class follows the Company Default Rate Structure.
Click the ![]() icon to view the default rates for the company as setup in Company Default Rates.
icon to view the default rates for the company as setup in Company Default Rates.
Uncheck this box if this Product Class does not follow the 'Company Default Rate Structure'.
Set up unique default rates for this Product Class instead.
PRODUCT CLASS RATES
Window to view and setup the default rates to be used for this Product Class as explained for the Group Rates.
Note: The Rate Book column can be used to flag rates that should print on the Rate Book when it is printed using the Product Class Sort Option.
This does not impact the rate selection that prints on the document.
Rates for New Products:
When a new rental product is created in Add Rental Products, and if the associated Group has rates setup in the Group Rates window, then no rates are required on the individual product as rates will default from the Group.
If the products in the Group have varying rates and there are no rates defined at the Group level, then the rates from the Rental Product Class are copied to the new product.
Rates can always be modified later for specific products as required.
WEBSITE OPTIONS
Window to view the website options associate with that rental equipment in this Rental Product Class.
SHOW ON WEBSITE
Select one of the following options:
•Select Yes if this Product Class should be displayed on the website.
•Select No to prevent this class from showing on the website.
•Select System Default if the display flag should reflect the value set in Show on Website Default in Global Portal Settings.
BITMAP IMAGE NAME
Enter an optional image name for the picture representing this group on the website.
INTERNET DESCRIPTION
An optional description can be entered for this class that replaces the primary class description on the Portal screens.
This can be useful if your descriptions are geared for staff use, and a more public description is required for web users.
WEBSITE CATEGORIES
Categories of two to four levels can be used to organize how inventory is displayed for web services, as setup in the Website Categories window.
These setting to display the class on the website apply to both the Portal as outlined in Portal Overview.
This flag and the image names can also be setup for classes in Inventory/Division Settings.
Flags in Equipment Groups and in Rental Inventory also control products displayed on the website.
ADDITIONAL OPTIONS
Window to view additional conditions that can be activated for equipment in this Rental Product Class., as outlined in Additional Options.
ACTIONS:
Additional actions provided by buttons on the Rental Class screen include:
•Print a List of Product Classes:
Before selecting a specific class to view, click the REPORT button to generate a list of the product classes to a document or to a spreadsheet as outlined in Product Class List.
•Delete a Product Class:
The DELETE button is only active when the role assigned to the operator in Operators has permission to delete a class.
The role permission is setup in Security Roles on the Security tab of Configure System Settings.
Click on the DELETE button, then select the Product Class to be deleted from the window, and proceed as outlined in Delete Product Classes.
Topic Keyword: RSPC01