Transfer XML Export Files
Back Office Menu -> Daily Close Menu -> Transfer XML Export Files
XML data export files can be generated as part of the Daily Close 2 and Daily Close 3 posting, or from Automatic Job Scheduling as explained in XML Data Exports Overview.
The XML export files are saved in a folder on the fileserver as defined in the Company Daily Close Parameters.
Selected XML export files can be deleted and pulled down to a local drive using this Transfer XML Export File utility.
A parser can then be used to reformat the output with selected data that can then be converted to new formats.
Note: This utility is only visible on the menu tree if an XML Data Export Directory is assigned in the Company Daily Close Parameters.
Operator Security Role permissions should be setup for this menu option, as there is no further restriction to accessing or deleting the XML files on the server.
The prompts include:
XML EXPORT DIRECTORY
The directory and path on the fileserver defined in Company Daily Close Parameters is displayed, and cannot be changed.
This is where the XML exports have been saved.
DOWNLOAD DIRECTORY
The "home" directory for this Client is displayed.
If this is not the correct destination on the Client, the path can be changed in the Client Directory field before initiating the transfer.
Proceed?
Click ACCEPT to display the files available in these directories and to proceed with the transfer, or CANCEL to abort.
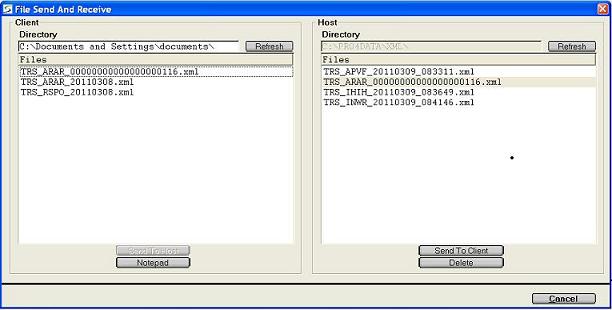
Resulting File Transfer Screen:
•CLIENT:
The left panel of the File Send and Receive screen represents the files on the Client in the "home" directory.
This is the target location to receive the file download on the Client. The Client Directory can be changed as required.
Existing files in the Client Directory are listed. Files can only be received and not sent from this location.
The list can be resorted in ascending or descending order, by clicking on the Files heading.
Certain types of files can be opened in 'Notepad', by highlighting the file name and clicking the NOTEPAD button.
e.g. txt, xml, etc
If the Client Directory is changed or files are received, click REFRESH to re-display the files in the selected directory.
•HOST:
The right panel of the File Send and Receive screen represents the files on the fileserver in the Host directory.
This is the source location where the XML files have been stored according to the path defined the Company Daily Close Parameters. The Host Directory cannot be changed, and files cannot be uploaded to it.
Existing files in the Host Directory are listed. Files can only be sent and not received from this location.
The list can be resorted in ascending or descending order, by clicking on the Files heading.
If files are deleted from the Host Directory, click REFRESH to re-display the files remaining in the directory.
Example:

Transfer a File from the Host to the Local Client:
To select a file to transfer, double-click on the appropriate XML file on the Host, or highlight the record and click the SEND TO CLIENT button.
A copy of the file is transferred to the Client and a copy remains on the Host until it is deleted.
Delete a File from the Host Directory:
To select a file to be deleted, double-click on the appropriate XML file on the Host, or highlight the record and click the DELETE button.
Confirmation is required.
If files are deleted from the Host Directory, click REFRESH to re-display the files remaining in the directory.
Finished?
Click CANCEL to exit.
Topic Keyword: XMLEX99 (4178)