Texada SRM Main Menu
Sign On Screen -> Main Menu
Menu Navigation
After logging in, the Main Menu as defined for the operator displays on the screen.
The menus are listed as large buttons on the left pane of the Navigation panel and only menus that are visible to this operator are displayed, as determined by the operator security defined in Security Roles.
Click NEXT PAGE button at the bottom of the list of menu buttons, or PREVIOUS PAGE button at the top, to scroll through menus that may not fit on the screen.
Clicking on any menu button focuses on that menu in the menu tree displayed on the right pane of the Navigation panel.
Sub-menus displayed as folders in the tree, may be expanded or reduced by clicking on the + symbol or - symbol beside the closed or open folder.
Specific programs can be accessed by clicking on the menu option in the tree or sub-tree
Example:

TEXADA WEB access
The Switch to Texada Web button can be used to open a new browser window to access the company associated Texada Web software.
This button is only enabled if the Texada Web feature is activated in the Logistics tab of the Software Integration options, and the operator has been given permission to "Texada Web Access" in the Operator Codes configuration.
Quick Launch
Menus and programs can also be accessed by using the Quick Launch field at the bottom of the screen in several ways.
•Using the Quick Launch assigned Menu Code:
e.g. Type in GL would display the General Ledger menu in the tree, providing the operator has permission to access the General Ledger menu, and providing GL is the Quick Launch code set for the General Ledger menu in the Application Menu Maintenance.
•Using the Quick Launch assigned Menu Option Code:
e.g. Similarly typing in GL01 in the Quick Launch field, would access the Chart Of Accounts program, providing the operator has permission to access this program, and providing GL01 is the Quick Launch code set in the Application Menu Maintenance.
•Using the Function Name or Description:
A window is provided on the 'Quick Launch' field to locate the option by 'Function' or 'Description' in the Locate Function Or Menu as follows in the:
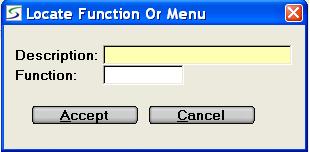
Two options are provide to locate a menu option, program or utility that is listed somewhere in the menu tree:
1.DESCRIPTION
To search by description, enter several characters, a word, or a phrase that is part of the menu option description, to generate a list of all menu options that include that text.
The search applies to how the option is defined on the menu tree which can be customized, not the screen title which is standard.
Only options for which the operator has permission, will be included in the resulting search list.
To move to that option in the menu tree, double-click on the appropriate record, or highlight the record and click the SELECT button.
2.FUNCTION
To find a specific function, skip the Description field and enter the program name and click ACCEPT, to immediately move to that option in the menu tree.
e.g. ARCF01 for Customer Information file
Program or Function names are included at the bottom of each page in the Technical User Guide and at the bottom right of each SRM screen in the information bar.
e.g. In the image above for Menu Navigation the program MENU03 is displayed on the bottom right.
If an operator has restricted access to menu options, only the Menus and Functions that are available to him on the tree, are located as determined by the operator security defined in Security Roles.
Note: This locate tool does not find any programs or utilities that are not on a menu that the operator can access.
This includes programs accessed from a button or option within another screen.
The Technical User Guide can be used to locate these programs. Press F1 and used the Index or Search tabs to search for options by key words.
•Using the Menu Option Code:
e.g. Typing in the menu code TEX:0004 preset for the GL menu by Texada Software, would display the General Ledger menu in the tree, providing the operator has permission to access the General Ledger menu.
•Using the Legacy Menu Option Code:
Legacy Menu Option codes (e.g. AP01, CO11, SM2001) from earlier versions of the software can still be used, if set in Custom Function Parameters.
This does not apply to legacy Main menus (e.g. AP).
In event of a conflict, Quick Launch codes over-ride any legacy codes.
Refresh Men Tree
A refresh icon is provided beside the "Quick Launch" field that can be used to reload the menu tree when additional menu options have been made available to a user, or to refresh the screen if it appears to be frozen.
System-Wide Messages
Server-wide notification messages can be generated to be displayed at operator sign on.
This notification process can be used in SaaS environments to alert operators about upcoming events, such as a server upgrade. It is a one time display and once viewed by an operator it is not re-displayed.
The system message can be flagged as optional or mandatory to view before a successful login and can be set to display for all operators, Windows (MFC) sessions only, or Web (Open Client) sessions only.
Only the Texada operator has the ability to click the SYSTEM-WIDE MESSAGES button at the top of the right panel to access and maintain the messages in the System-Wide Messages window.
Internal Messaging
The top right portion of the main menu screen provides a Messages feature to access an internal message system that does not required any Internet service for mail delivery within SRM.
If your firm uses Texada Web, messages can also be sent through the Internet to the Texada Web Mobile devices to communicate with drivers and mechanics.
For information on the Texada Web processing refer to Logistics.
Click the NEW MESSAGE button to send messages or the READ button to review messages. as outlined in Internal Messaging.
Note: If there is no 'Internal Message ID' defined for the operator in Operators, the Internal Message feature will only be available for Texada Web messaging.
Distributor Information
A custom message can be set to display on the main menu screen below the Internal Message summary.
Up to seven lines of text for this information can be defined in Distributor File.
The default message is displayed if no details are setup in the Distributor File.
Help/Manual Access
In an MFC Client, press <F1> to load the Technical User Guide.
In an Open Client session click the ? at the bottom right corner of the screen to load the Technical User Guide.
This help file is context sensitive so that it opens at the page in the manual corresponding to the program that is currently being displayed on the screen.
The manual Contents is displayed on the left panel of the screen.
Click on the link in the Contents tree to view details on that option.
Links are also provided in the body of the manual text that can immediately access related manual sections.
Index and Search tabs are provided in this panel to help locate pages & contents.
Most menus offer an 'Overview' option providing helpful information about Start-up and general procedures associated with this menu.
For more information about the Help Manual, refer to Technical User Guide.
ACTIONS:
Additional actions provided by buttons on the Main Applications Menu include:
•Change Your Password:
Click the SET PASSWORD button to access the utilities to change the current operator password or to set a Lock by selecting one of the following:
oClick the SET PASSWORD option and if your firm does not sign into the software using "Operator by Division", to update the current operator password in the Set Operator Password utility.
If your firm does use "Operators by Division" the prompt to "Change your password across all divisions?" is triggered providing the following options:
▪Click NO to only update the current operator password in Set Operator Password.
▪Click YES to update the password across all divisions using Change Operator Password in All Divisions.
oClick UNLOCK USER and proceed with Enable or Disable Operator Login.
This option is only available to operators assigned a Security Role that allows permission to Reset Locked Accounts in the "Reset Flags" window of the Security Role Permissions, will be given the option to:
•Open the Cash Drawer:
This button is only available if the operator currently signed into the software has a specific 'Cash Drawer' assigned in Operators, or there is as Division default Cash Drawer assigned in the Divisional Miscellaneous Parameters.
Click the CASH DRAWER button to manually force the Cash Drawer associated with the operator or operator division to open.
If the Prompt For Clerk flag has been set in the Company Security Parameters, the Clerk Confirmation window is triggered to capture the clerk code and also the password if required.
The Reason pop-up is then triggered so a reason for opening the drawer can be entered.
The reason and clerk security is captured and logged in Cash Drawer Inquiry for function RSOD02.
•Select a Printer for this Session:
Click the SET PRINTER button to access confirm or select a printer in the Printer Selection window.
•Access the Support Command Line:
Texada Support has the ability to click the COMMAND LINE button from the main menu to access the Command Line.
•Change SRM Division
The CHANGE DIVISION button provides the ability to switch between SRM divisions available to the Operator.
Selecting the new Division from the listbox is required when the Texada Web signon is different by Division.
Note: The Division/Location for the current session is not displayed in the list.
•Temporarily Lock a Session:
This security feature is not available when the external 'Authentication' feature is enabled in the Texada Support Parameters.
When available it provides the ability to lock the session from the main menu screen, by clicking on the LOCK button.
Then to unlock the session and continue, the operator can click the UNLOCK button on the pop-up dialogue box and enter his sign on password, or click LOG OFF and re-sign in as a new operator with permissions and password of the new operator.
•Close a Session:
Click the LOG OFF to sign out and exit a session.
Then in the Texada SRM - Log On screen, another operator can sign in or click the EXIT button to terminate the session.
Topic Keyword: MENU03 (5027)